
I fucking love kimchi. I’m also really picky about kimchi. Most kimchi isn’t very good. The good stuff, however, is to die for. This recipe meets my requirements.
The particular variety of kimchi that I make is based on daikon radish and is called kkakdugi in the Korean language. I usually make it using storebought ingredients, but every ingredient besides the salt can be grown successfully in your home garden in temperate climates, with the garlic and radish being the easiest, ginger and peppers being very do-able, and the pear requiring a much longer timeframe to pay off.
These ingredients are all you need to make this recipe. For 100 g of radish, these are the correct amounts of other ingredients needed. For reference, the large daikons I have grown and find in my local produce markets are typically 300 to 400 g each.
- Fresh whole daikon radish, 100 g
- Asian pear, 37 g
- Garlic, 4 g
- Ginger, 4 g
- Gochujang sauce/paste, 9 g
- Salt, 4.5 g
No substitutions can be allowed. The radish must be daikon. The pear must be Asian pear and cannot be a Bartlett, Bosc, or any other kind. In my neighborhood (north of Seattle) the only place I can reliably get Asian pear is Haggen, which is conveniently typically a good place to buy my daikon if I haven’t grown my own. You need this amount of pear to provide sufficient sugar to feed the fermentation. These ratios will yield you a 3% salt content by weight, which is safe for fermentation. If you make this recipe and it spoils, you might want to add a bit more salt, but this has always been enough for me.
For the gochujang sauce, I strongly prefer Lucky brand, which comes in a squeezable tube. I have had OK results with Mother in Law’s brand, which comes in a jar. I have had poor luck with Sempio brand, which comes in a red plastic tub.
The radish is rinsed under cold water, then peeled with a potato peeler, and finally cut into cubes that are between 6-10 mm wide (1/4″ to 3/8″). I use one of these kitchen implements to quickly cube my daikon in just a minute or so. You can also always cut it entirely by hand with a knife, but the chopper makes it so much easier, and I find myself also using it for a bunch of other meal prep tasks in the kitchen, so it’s absolutely a worthwhile investment for how cheap it is.
Everything else gets peeled (ginger/garlic/pear), cut into chunks, and then blended together to form a fine pureed red sauce. I use a Magic Bullet blender for this step.
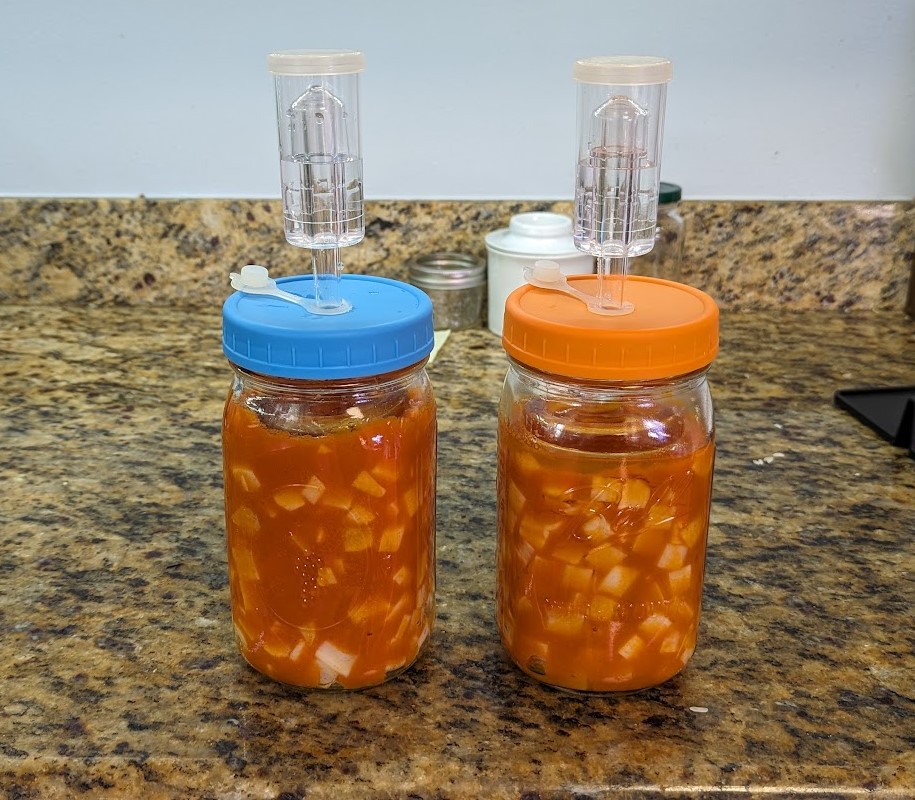
I prefer to use 1-quart mason jars for my fermentation, but for smaller batches a pint jar will work. You can comfortably fit 400 g of daikon plus the red sauce in a quart jar.
Start by pouring a few mL of vinegar in the jar and sloshing it around so that all internal surfaces get wet, which sanitizes the glass and reduces risk of infection without affecting the taste of the kimchi. Then dump the vinegar down the drain. Do not rinse the jar with water: it should ideally still be wet with vinegar when you start adding ingredients. Next, put 2 handfuls of daikon in the jar, followed by a healthy dollop of the puree. Repeat until you are out. You can stir this mixture in the jar with a clean spoon if you want to get better coverage of the sauce on the radish, but it’s not strictly necessary, just try to get the entire upper surface of the radish cubes covered. Also, you do not need to add any additional liquid. The salt will draw moisture out of the daikon, and by tomorrow the liquid level will be above the top of the radish cubes. Air pockets within the mixture tend to work their way out within a day or two and don’t typically present a problem.
I use a fermentation kit like this one that’s designed for wide mouth jars. I spray the lid, gaskets, airlock parts, and weight with vinegar before use to sanitize them. (After each use, I run all of the individual pieces through the dishwasher before putting them back into storage.)
I put the glass weight on top of the mixture in the jar. If there is any sauce on the rim of the jar, I wipe it clean with a clean paper towel that’s been wetted with vinegar. Then I attach the lid. I fill the airlock with vinegar and install it. Finally, I put the jar in a cool dark place to ferment. I have done this in a cabinet inside my house before, which is air-conditioned. These days, I prefer to use my fermentation fridge, which is just a super cheap fridge I bought second-hand that I have fitted with an Inkbird brand external temperature controller. I will typically set it somewhere around 55 F (13 C) when I’m using it for active fermentation.
Let this ferment for at least 2 weeks undisturbed, and preferably for 4 or more weeks. There is no need to go longer than about 8 to 10 weeks. At that point, all the fermentation that’s going to happen has happened. Good kkakdugi (in my opinion) should be extremely sour, so I always let mine go for at least a month before I taste it for the first time. Longer fermentation times yield a more sour/tangy and less sweet result. Sometimes you may also detect flavors you don’t love when the kimchi has not fermented long enough, which will mellow out if you give it more time. However, to some degree that mellowing will also occur while you have the finished kimchi stored in your fridge.
As with any fermentation, standard rules apply. This includes cleaning, sanitization, and achieving sufficiently high salt content to suppress spoilage during fermentation, followed by achieving sufficiently low pH (high acidity) to suppress spoilage after fermentation is complete. If you’re closely following the recipe I’ve described, you should be OK as far as salt and pH go, but if you’re just starting out with fermentation, consider watching a few intro videos on Youtube before you dive right in and try to make kimchi.
Once you are satisfied with the result, you can remove the airlock and glass weight, and cap the jar with an ordinary mason jar lid and ring. I tend to use a clean spoon at this point to thoroughly mix up the kimchi as well. You will need to store it in a regular refrigerator (low 30s F, close to 0 C) after you remove the airlock to prevent further fermentation from occurring, which could burst the jar.
My favorite way to eat this kimchi is over white rice as a side for kalbi marinated steak. The combination of the savory meat, sweet rice, and tangy-salty-spicy-crunchy kimchi make for the perfect mouthful.